Roughly 18 years ago, you were likely first introduced to the concept of Peer-to-peer by applications like Napster or LimeWire. The technology for Peer-to-peer, today, is used a little different by applications that adopted it. The primary use cases now are for serving data, discover other users nearby or in some cases even make you more anonymously. Let’s say this is a technique that is much used around the internet in so many applications but is relatively unused in a web browser and I might understand why.
The internet that we now know and use today is far from what it was back in 1960 when it was first introduced under the name ARPANET (Advanced Research Projects Agency Network). The majority of the user’s where scientists who helped build the internet. A couple of years later in 1969, Steve Crocker invented the RFC (Request for Comments), so the community could exchange ideas and document them. In the first RFC, they talk about Peer-to-peer which they called Host-to-Host which is the first time they envisioned such idea about how the internet could be decentralized.
While this idea was being discussed back then, it did not end up being used for serving web content. However, if you take a look online and see how many applications have been made for file sharing, blockchains or anything else, it’s no surprise that this innovation did bloom in other areas on the internet.
That is reason enough for me to get a more in-depth peek on the subject and start to build a Proof of concept. Side note: if you read my previous post, you have seen me create 3 Proof of concepts, this time I leave it at just one. This subject is a bit more complicated than last.
Peer-to-peer seems relatively straightforward — all users send and receive data from each other, but before any Proof of concept can be made there is a lot to understand before actually writing some code. The first thing that should be understood is networking, to be specific; networking for when a user connects to a web server. There is an image with four steps that should explain how networking works (Very oversimplified!).

An oversimplified version of how networking works.
Above is the most straightforward way I could show you on how a user gets there web content. There are two servers shown that plays a crucial role in delivering content to the users. Those servers are the ones that you; a developer has full control over.
Let’s figure out how we could use our newly discovered knowledge about networking and come up with a creative idea. I figured there are two ways we could exploit those servers to make a website Peer-to-peer:
- Make the DNS (Domain Name System) point to a central “Collect and Connect” server and redirect users to a new tab which then service the whole website through Peer-to-peer.
- Let users connect to the website where they get a small portion of the content which helps set up a connection to other users and serve the whole content through Peer-to-peer.
While the first idea would make the process of getting multiple sites Peer-to-peer effortless, there are some technical difficulties I think we need to overcome (sharing data between browser tabs, mainly back-end code, and so forth) that would not work in the timeframe I have. Therefore let’s build the second idea, and we will review the first another time because frankly, I would love to make that concept work too.
With our better understanding of networking and the idea we chose. We should be ready to explore the whole Peer-to-peer in the context of the web. However, we need to frame the subject a bit better, so we can select a good web innovation for our use case. For that, we need a list of so-called demands that this wonderful innovation should have:
- Needs to work in browsers like Chrome or Firefox
- End users shouldn’t have to do anything (install software, complicated actions, and so forth)
- Should be possible to implement in any website by a front-end developer.
- Needs to be free to use.
The list should help us select a web innovation that would suit our criteria and make it possible for you — the reader — to implement it by yourself, which is part of this post.
After searching online, one technique came up: WebRTC.
What is WebRTC you might ask? Well, WebRTC (Web Real-Time Communication) is a technique to make real-time communication between browsers and mobile applications happen through a Peer-to-peer connection. This connection is set up using an API (application programming interface) which we could access natively with JavaScript and is supported within in all major browsers. This technique can handle three types of data: video, audio, and files/data.
So did we find the solution here? WebRTC seems to be too good to be true. Well, let’s continue further and get a taste of how WebRTC works.
Understand & Implement
In my experience putting together any project which involves coding something new, requires some research into similar projects, and how these techniques work. So let us take a look at what we could learn from the samples that are on the WebRTC GitHub: samples
Looking at the list, you can find examples for the three major components of WebRTC — which I will be explaining to you later on. Those samples show some use cases for WebRTC, but I did find it odd that all samples were local (in browser Peer-to-peer connection with yourself) and none of them connected two or more users over the internet. Except for the last sample which is kind of hard to understand if it’s you have no experience with WebRTC.
Even though those samples help us understand what we could develop, you still have no idea how it actually works. In our next step, we are going to look at posts and documentation that explain WebRTC. Lucky for you I did the reading and will try to explain it as short as possible how WebRTC work.
There are three components that are important in WebRTC, let’s first look at getting access to the camera and microphone which they refer to as getUserMedia and the second on, setting up a channel for communication which they refer to as RTCDataChannel. The code examples below should illustrate those two components.
getUserMedia is used to get a video or an audio stream and behaves like a Promise. A Promise is used because the data you get is a stream which is asynchronous. For some of you, those terms mean nothing yet. Not to worry, there is a post on Scotch.io that explains it. TLDR; With a Promise it expects to get data, but don’t know exactly when it will arrive, or if it will. When the data arrives, it will be handled in then, and all other errors will be handled in the catch. This whole process is done asynchronous which means it won’t block the rest of your code from executing before a Promise is either resolved or rejected. The example below uses a Promise to handle the media stream.
// Prefer camera resolution nearest to 1280x720.
const constraints = { audio: true, video: { width: 1280, height: 720 } };

navigator.mediaDevices
    .getUserMedia(constraints)
    .then((mediaStream) => {
        const video = document.querySelector('video');
        video.srcObject = mediaStream;
        video.onloadedmetadata = (e) => {
            video.play();
        };
    })
    .catch((err) => {
        console.log(err.name + ': ' + err.message);
    }); // always check for errors at the end.
Code snippet from Mozilla for getting access to audio and video.
RTCDataChannel is used to set up a data channel over which data is transferred. Those channels are bi-directional, and every channel is associated with an RTCPeerConnection.
const pc = new RTCPeerConnection();
const dc = pc.createDataChannel('my channel');

dc.onmessage = (event) => {
    console.log('received: ' + event.data);
};

dc.onopen = () => {
    console.log('datachannel open');
};

dc.onclose = () => {
    console.log('datachannel close');
};
Code snippet from Mozilla for creating a DataChannel.
The above snippets seem to make it look like it’s reasonably easy to implement WebRTC and although those two snippets of code might be reasonably straightforward to write and understand, to make two users connect you have to implement RTCPeerConnection which is not just one line of code you saw in the snippet above.
To make my Proof of concept work we should at least connect two users, but before you get to see the result, there is one last component that you should understand -It kind of brings everything together. So let’s see what RTCPeerConnection exactly does.
Networking traditionally would require a user to make the connection to a web server, simply because the web server has no idea where to send the data. This principle also applies to WebRTC, you need to connect to a web server to get started, but this doesn’t mean you instantly have a connection to a secondary user. No, they both need to have another type of connection to a server and first negotiate which protocol they are going to use. After that, there are some more steps required and servers before the real connection can be made.
The first step requires both users to discover each other and exchange which protocols they’re going to use for setting up a connection, this process is called signaling but how you do this, is not specified by WebRTC. They give you the freedom to make use of any protocol. For the process of signaling, you need your first extra server, so users are discoverable for each other, but you could also serve your website through Node.js, so you don’t need an extra server. In my case, I used a third-party server for this because I needed a quick way to have those functionalities.
The next step is to get the IP address and port from the users so they could connect through a firewall, this is where you need a STUN (Session Traversal Utilities for NAT) server. Lucky for us those servers are hosted by Google and are public. However, if you wanted to make them yourself, you are free to do so.
After you got all those parts done, you are ready to connect. The connections are made with an ICE (Interactive Connectivity Establishment) framework. ICE handles the connections to other candidates which is their term for users.
The steps above only illustrates the steps you need to overcome before your able to connect users over a Peer-to-peer network. Sadly enough to make those steps work for real, you need a deeper understanding of how it works or take a look at the Proof of concept which is at the bottom of this post. However, for now, you have a basic understanding of the steps which is sufficient for now. For those that would like to understand the full picture, you should go to html5rocks.
Now we understand the basics of the WebRTC networking part, let’s see what I have made. The first thing you will see down here is an overview of the networking that’s required for a Peer-to-peer connection — at least it’s how it looks like for the Proof of concept.
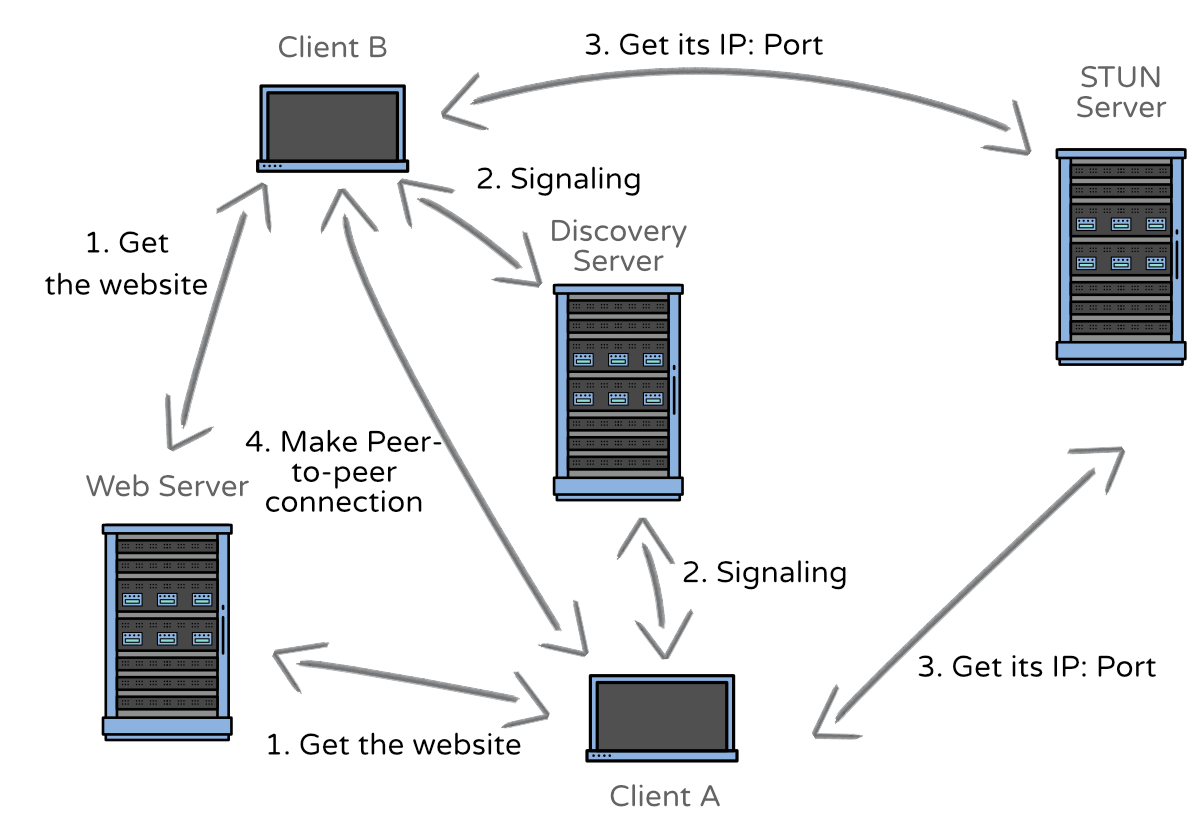
Overview of the network for setting up a Peer-to-peer connection.
As you can see in the image above, there are many servers involved in setting up a Peer-to-peer connection. You could even say it’s not even worth the trouble because it’s inefficient for the purpose of sending over a small amount of data but even with the number of servers, there is one I left out for this demo, a TURN (Traversal Using Relays around NAT) server. A TURN server functions as a backup connection in case the Peer-to-peer connection fails to set up.
Even without the TURN server, I did manage to get it partially working, which has to do with networking being very complicated. So let me tell you what the Proof of concept does. When you first connect you get an option to create or join a Peer-to-peer session. After that, you can head over to another device or open a tab and join that session. If the two devices are connected through a Peer-to-peer connection, a JSON (JavaScript Object Notation) is sent over from the other device and displayed.
If you like you can check out the Proof of concept yourself: Peer-to-peer
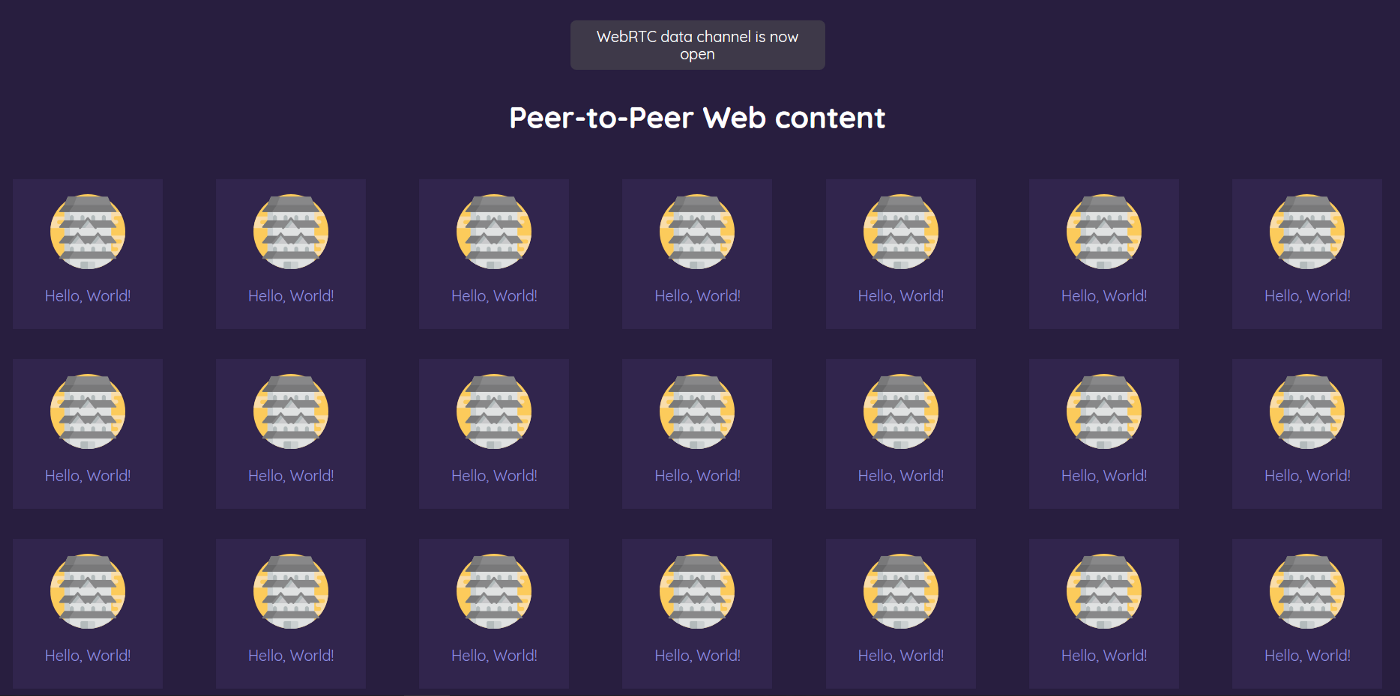
Page view of successful transfer of data over Peer-to-peer.
The Proof of concept I made is experimental and could not work on your device/browser. I will do my best to make this Proof of concept function properly on any computer running the latest version of Chrome or Firefox.
Conclusion
For our conclusion on Peer-to-peer, let’s talk about what my experience was like using WebRTC. The nice thing about this technique is that’s a JavaScript API which makes it quite accessible to start using it right away. However, you may have noticed that WebRTC requires a broader knowledge of development before your able to implement the full API. In short, the learning curve is quite steep which is a huge drawback for most (new) developers — I assume — for using a technique. The networking for WebRTC is also a big part of the API and is quite tricky if you have no prior knowledge on writing back-end code or setting up servers. This where I would say, it’s almost getting to hard for a front-end developer to set up this API for a website. Which I find very odd, this is a JavaScript API for front-end developers. As a front-end developer, you have almost no option but to use code which is written by others for running those servers (STUN, TURN, signaling) or use a third-party server for handling all networking parts. I pointed out earlier is very inefficient running that many servers for a simple Proof of concept.
Why should you use WebRTC?
We used WebRTC for sending a small amount of data, but if you start to send over more data or a stream of data. You will experience the full impact of Peer-to-peer on your server. Definitely when you don’t need to run all that data through those servers, which in return would save on cost per GB data and could save you from needing to deploy even more. Also, the end users could have an advantage for faster load times because the Peer-to-peer networks can work like a CDN (content delivery network), at least if you’re up for the challenge of building it.
Even though WebRTC has a steep learning curve, it requires a broader skill set because you wouldn’t find any other well-implemented Peer-to-peer solution for browsers. There are of course other solutions on the market that can do Peer-to-peer, but those require their application, which is out of the scope here.
What should they change?
After my experience with reading about WebRTC there were so many things unclear, even after doing so I couldn’t implement the API. In my opinion, having an up to date tutorial for setting up a “simple” real life project would help others get started quicker and possibly adopt the technique better. Although I’m not yet happy with WebRTC and their documentation I must say that networking, in general, is incredibly hard and they managed to simplify the process. Which in return makes the technique more accessible for people who wouldn’t be able to build something that involved Peer-to-peer networking.
Discussion
Let’s close off this post with what you think of WebRTC, Would you use it yourself? Which developer is in your opinion in charge of implementing a JavaScript API?
I would love to hear your opinion on this topic!
This post is the end of part 2 of my web series on “forgotten” web innovations. If you enjoyed reading maybe you like my first post on audio too: previous post